
How to submit a soil sample
The following steps apply to DIY soil sampling. To request an on farm visit and collection of samples contact Ian Mot on 0434 822 199 or through the contact page.
1. Complete the payment:
To request a testing service contact VSS to discuss your testing needs or purchase a testing package directly online. After payment is completed we will provide the laboratory submission documents and instructions.
2. Collect soil samples:
Soil sample collection guide is provided bellow. Soil testing results are only useful if the proper sampling technique was followed.
3. Post the sample & documents to:
Environmental Analysis Laboratory Southern Cross University
PO Box 157
LISMORE NSW 2480
EAL Contact: 02 6620 3678
Sample Collection Steps
1. Area of interest: The primary goal when collecting a soil sample is to gather a representative sample of the area of interest. This may be a paddock, garden bed or specific region. For example, a sample can be collected to discover the underlying nutritional issue in an area of crop disease. In this case the area of interest is only where disease is present. Combining poor areas and good areas will results in a report full of meaningless numbers. It is important to collect a sample that represents a clearly defined area, not mixing different soil types, and differently management practices.
2. Sampling depth: The sampling depth is chosen based on the root depth or how deep nutrients can be incorporated. Generally, in vegetables a surface sample would be 22cm deep. In pastures, 15cm may be chosen. A deeper sample will result in a deeper amendment program in fertiliser recommendations. This may increase application rates.
3. Collection tools: There can be a large variability between surface layers and lower layers of the soil. For this reason, it is important to take an even sample throughout the sampling depth. This is effectively achieved with a soil probe to take a cylindrical core. A rust-free shovel is sufficient (rusty buckets and tools can distort micronutrient analysis and should be avoided). A PVC pipe can also be used to take an even sample core.
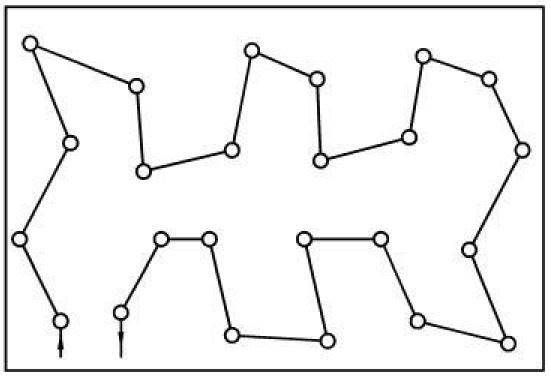
4. Representative sample: To represent an area, at least 10 samples should be collected and mixed together in a clean plastic bucket. This mixing process provides an average of the nutrient levels in the area of interest. The below diagram is an example of multiple samples being taken to represent the field evenly.
Avoid contaminated areas in the vicinity of gateways, animal tracks, animal camps, fences, troughs, trees, fertiliser or lime dumps, planter or any spot which does not represent the area of interest.
5. Sample labeling: After mixing the samples in the bucket thoroughly, fill a sandwich zip lock bag with 200grams or a cup full of soil. Label with the date and “sample name” - area of interest ID. This process can be repeated for each area of interest.
Contact for assistance:
0434 822 199 or i.mot@vitalsoils.com.au